Leopard Print Cake Tutorial (Pattern Inside)
We are so excited about our leopard print cake.
Not only does it have a sweet baby shower theme with cute leopard print baby shoes, but we also carried the leopard print to the inside of the cake! Eek! So much fun!
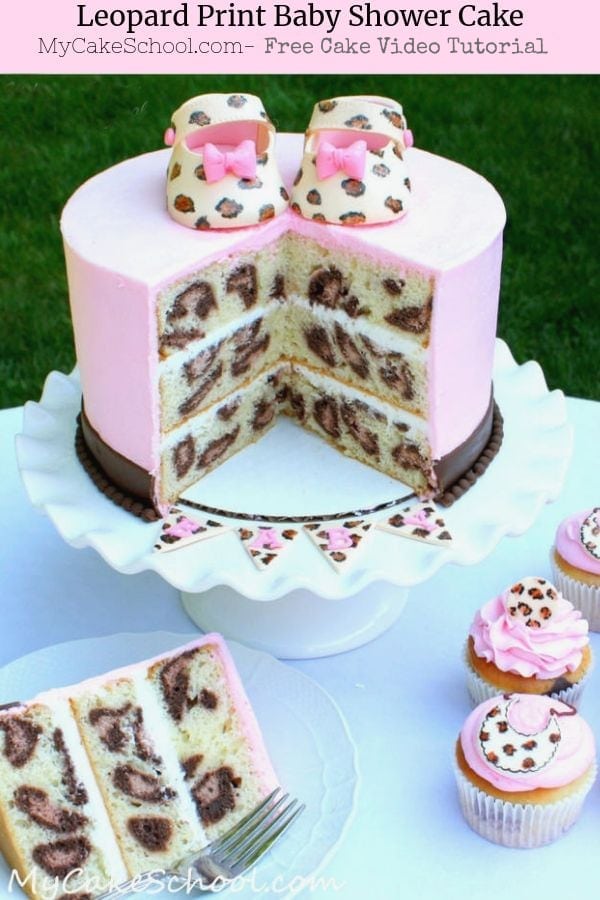
I posted a photo of our cake on our Facebook page a couple of days ago and the response has been unbelievable! So, I can tell you with certainty that if you make this cake for someone, it will be a hit.
There is more than one way to make a leopard print cake. In fact, in our leopard print cupcake video, I demonstrate another way.
However, for cake layers, I find that the technique demonstrated in this video works best for me. I've listed some supplies and additional notes beneath the video---I hope that you enjoy it!
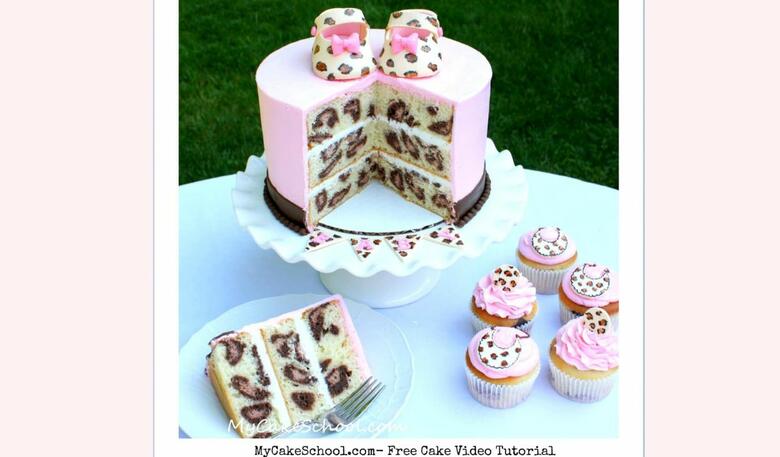
Table of Contents
How to Make a Leopard Print Cake on the Inside
Make sure to watch the video tutorial further down in this post, as well as our printable how-to card. Here is just a quick rundown of our steps:
Three Shades of Batter:
For our leopard print cake, we are working with vanilla cake batter- we divided it into three colors: plain, light brown, and darker brown (almost black). See measurements in the card below.
Fill three piping bags with the different colors.
Filling the pans:
Start by putting a thin layer of white batter–approximately 1 ¼ cups- into each of the three pans.
Time to Pipe the Lines (which will become our spots)! Pipe elongated lines of the dark batter on top of the white batter. You don't want the bands of dark batter to be very thick, but pipe them wide enough for the lighter shade of brown batter in the next step.
Light Brown Lines: Next, pipe thicker (but narrow) lines of light brown batter on top of the dark brown lines (these light lines are not as wide).
Go back in with the piping bag of dark brown batter, piping an outline around the light brown batter and on top. Enclosing the light brown batter in this way will give us the look of leopard spots later.
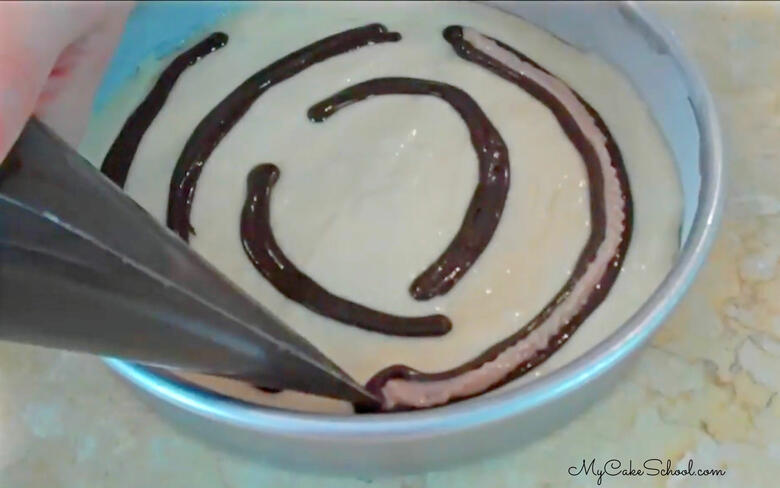
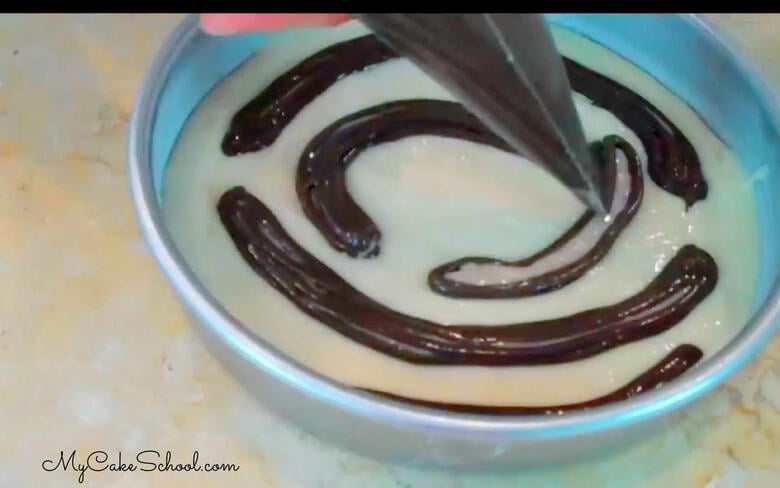
Using a piping bag with the tip snipped away, pipe on a layer of the white batter to cover the dark lines.
Optional: Another Layer of "Spots":
Next, still working on the same pan of batter, repeat the above steps, making one more layer of leopard print batter. (This is going to give us two layers of leopard spots in each cake layer).
If you would prefer to just have one layer of leopard spots per cake layer, that is fine also! We just wanted extra spots ;0)
Follow the above steps for the next cake layer(s) also. Then bake the leopard print cake according to recipe instructions.
And here is our sliced cake!
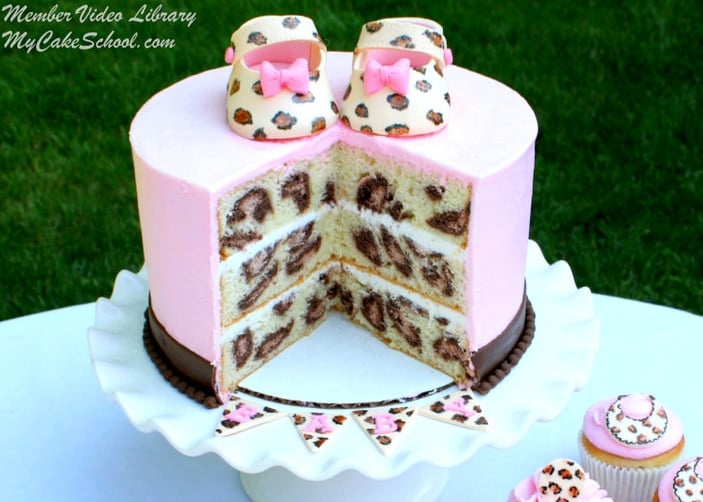
Thanks so much for stopping by. We hope that you enjoy this leopard cake and leopard cupcake design tutorial!
We have many more free cake decorating tutorials for you! Here are a few more animal theme designs for you! You should also check out our baby shower cakes for more ideas!
Leopard Print Cake Video
Leopard Print Cupcakes
If you loved our leopard print cake tutorial, make sure to check out our leopard print cupcake tutorial as well!
You will love this simple technique for creating leopard spots in cupcakes- they match our cake perfectly ;0)
A Different Method-Leopard Print Cupcakes
In my leopard cupcake video, I layer dots of dark batter, light batter, and dark batter here and there rather than making the elongated layered lines.
The “layered lines” of batter that I use in this cake video allow me to make lots of dots at once. For me, it is easier and ensures that every slice will have at least a couple of dots, while the “layered dot” method gives a more sporadic arrangement.
The layered dot method does work well with cupcakes though, since they are so small! I’ll post our cupcake video and so you can decide for yourself what works best for you!
Leopard Print Cupcakes Video
Leopard Print on the Inside Cake (for a Baby Shower!)

Learn how to make a Leopard Print Pattern on the Inside of your cakes in this free cake video tutorial! Today's cake has a fun baby shower theme, complete with baby shoes on top!
Ingredients
FOR THE CAKE LAYERS
- We made a 3 layer, 8 inch cake (2” deep pans) using a double batch of white almond sour cream cake-doctored cake mix recipe. You can use any recipe you’d like, as long as it is white or yellow…and for best results, use a batter that isn’t too runny.
- Cocoa Powder– We used this to tint part of our batter (2 tablespoons). You could also use coloring gel.
- Coloring Gels– Use whatever brand/colors you like. This is what we used- Americolor Ivory to tint our gum paste for the shoes & bunting, Super Black & Chocolate Brown for tinting our batter & for painting our leopard spots, Deep Pink for the letters & bows on the shoes.
- Buttercream Frosting– We used our “Fluffy Vanilla Buttercream” recipe.
DECORATIVE ACCENTS
- Satin Ice Gum Paste &/or Fondant—We used gum paste for our shoes & bunting, but you could also use fondant with tylose kneaded into it.
- Vodka/Lemon Extract-Mixing a small amount of either with coloring gel will give you the “paint” for your leopard print.
- Tylose Powder/Sugar Glue– This is our preferred food safe “glue”. You can easily make it by dissolving a ¼ teaspoon tylose into 2 tablespoons of warm water.
- Template– Baby Shoe Template
- Star cookie cutter—I used this to quickly create uniform triangles for our pennants/bunting.
- FMM Alphabet Block Set- Upper Case Tappit Cutters- (Optional) – to spell out “baby” on our bunting.
- Satin Ice Chocolate Fondant- (Optional) I had to knead in some white fondant to lighten it. This is for our fondant ribbon border.
- Silicone Pearl/Bead Former- We used the 6mm size. This was for the trim at the base of the cake.
- FMM multi-ribbon cutter (aff.) (for fondant ribbon around base of cake). Mine was spaced at 1 inch. You could also just measure and cut by hand.
MISCELLANEOUS
- Small paint brush for paining leopard spots
- plate or palette for mixing your “paint”
- parchment paper, plastic piping bags for dispensing your batter
- sharp knife, blade, or x-acto for cutting out your template
Instructions
FOR THE LEOPARD PRINT CAKE LAYERS
- (Preheat oven and prepare pans per recipe instructions. We used the White Almond Sour Cream Cake- Doctored Mix recipe)
- After mixing up the batter we scooped approximately 1 ½ cups of batter into one bowl, and ½ cup of batter into another bowl. The remaining batter will stay white.
- Mix 2 tablespoons cocoa powder into the first bowl (This will be the darker of the two shades of brown). Then we alternated drops of brown and black until we got the shade of very dark brown that we liked. (Approx. 2-3 drops each).
- We tinted the 2nd bowl of batter with a little bit of the batter from bowl #1, and then a drop of brown coloring gel. This batter should be a light shade of brown.
- Once you have your two shades of brown batter, scoop each color of batter into a separate disposable piping bag. You'll have a light brown, dark brown, and white piping bag of batter.
- Now you are ready to begin the process! With each pan, start by putting a thin layer of white batter–approximately 1 ¼ cups for my 8 inch pans.
- Time to Pipe the Lines (which will become our spots)! Snip the tip of the piping bag for the dark brown batter (not too big). Pipe elongated lines of the dark batter on top of the white batter. You don't want the bands of dark batter to be very thick, but pipe them wide enough for the lighter shade of brown batter in the next step.
- Next, pipe a thinner light brown line of batter on top of the dark brown lines (these light lines are not as wide).
- Go back in with the piping bag of dark brown batter, piping an outline around the light brown batter and on top. Enclosing the light brown batter in this way will give us the look of leopard spots later.
- Using a piping bag with the tip snipped away, pipe on a layer of the white batter. Pipe all around and on top of the lines.
- Next, still working on the same pan of batter, repeat the above steps, making one more layer of leopard print batter. (This is going to give us two layers of leopard spots in each cake layer). If you'd prefer to just have one layer of leopard spots per cake layer, that is fine also! We just wanted extra spots ;0)
- Follow the above steps for the second cake pan also.
LEOPARD PRINT BABY SHOES
- Use template for the Mary Jane style baby shoes to cut out gum paste pieces. Roll out your gum paste, and cut out the parts using the template. My shoes are made from ivory-tinted gum paste, but with a "lining" of thinly rolled pink gum paste. After making the first cutout, flip the template to cut out the second so that you don't wind up with two right shoes or two left shoes.
- Glue the pieces with tylose glue (a combination of tylose powder and a small amount of warm water). You can use a little pillow stuffing or plastic wrap, etc. to fill the soft gum paste shoes until they are dry. Add gum paste bow and paint on leopard print spots with a "paint" created from brown and black coloring gel + a touch of vodka.
- It's best to do the shoes at least a day in advance.
Final Details
- I created the little bunting with triangles of gum paste. "Baby" letters are cut out from Tappit Cutters.
- Our cake is frosted with vanilla buttercream and the border is brown fondant (I used chocolate fondant). I cut a strip (using an FMM Brand Multi Ribbon Cutter) about 1.5 inches wide to wrap around the base, and then used a silicone bead former to create brown beads of fondant to wrap around the base.
Recommended Products
As an Amazon Associate and member of other affiliate programs, I earn from qualifying purchases.



This was the best so far. I'm a little worried about the shoes. I haven't worked with fondant much but will be practicing soon. You are so talented and I am very happy I found your website. Thanks Melissa and BeBe.
Hi Melis and Bebe-
I haven't had a chance to watch the tutorials for this method yet- but I can not wait to do so!!! I just saw on the CC site that someone has already posted a method for doing this. I hope it is not the same exact method, and taken from here without your permission- you know what I mean. I know how hard you guys work on the tutorials and your "students" get to reap the rewards.
I have used techiniques learned from you on almost every cake I have done- so.. thank you for all you do. I tell everyone about My Cake School- it is fantastic!!
Sorry, this is kind of long...I tried this this afternoon, I haven't cut into it yet but I have a feeling it is going to be more of a gorgeous bright pink, ivory, and dark chocolate cake! I used my favorite chocolate cake recipe which is super thin, almost soupy ( a delicious cake) and then the WASC recipe. The think dark was the main color and the WASC was the spots in pink and it's natural lovely color. They looked good when I first started but the heavier thicker batter seemed to kind of sink (or maybe the thin batter sucked it in). Anyway, by the time it went in the oven, it was definitely a bit marbly. It's very pretty on top and when I cut the top off, it looks beautiful but I'm guessing it won't be leopard spots. I used the leftover WASC cake to practice the cupcakes, so far I've cut three and they have big pink and brown smiles in the middle of the ivory cupcake. , I'll keep cutting to see how the spots came out as I did each one slightly different to experiment. It was fun and I'm sure will be lovely, I just may not advertise it as leopard spots! ;-) Next time I'll use the same cake batter for all parts. Thanks so much for these videos! Going to try the zebras too!
Thanks everybody for your comments! @Anita-- Don't worry, the baby shoes are not difficult to make! I do find it a lot easier though to either work with gum paste or fondant with tylose kneaded into it than straight fondant.
@Deborah~ I'm sorry, I do think that having the dark and light batter as the same consistency/recipe is going to help a lot. Since your chocolate batter was much thinner, i can see how that may cause issues---but, I'm still curious as to how it looks when cut. (Looking at the top view it's almost impossible to tell.)
Again with the cupcakes, it may just be the difference in consistency of the two batters. We used WASC because it is a thicker batter-- Thanks for letting us know your experience!
@Maureen--Thanks for your message! Someone tagged me on Facebook with CC's post of the leopard print cake. It's not the same (more time consuming). Thanks for supporting our site, so glad that you are still enjoying it! ;0)
Doing a small wedding cake today...and giving this a practice shot on a 6" cake. I have a baby shower coming up, and she said to do what I wanted....I hope this turns out, its soooo cute! Now, I have designer cakes..zebra, cammo and polka dots...and now, Leopard! Thanks Melissa!
Thanks Brenda, hope it worked for you!
Hi Just some advice please. An attempting this for the first time but we don't have same box mixes here in the uk. Would we make up a usual 8 inch mix and then guesstimate how much mix to take out for the spots? Then keep layering til mix is used up?
Also what temperature and how long do we cook it for? Many thanks for the fab tutorials! Xx
OK, we just cut the cake....NO SPOTS anywhere to be found...even though the top of the cake was a pretty pink and ivory swirl. The rest of the spots must have just disappeared into the dark chocolate thinner batter cake. I used leftover WASC batter for the cupcakes, as mentioned above. I haven't cut into them all yet but at least you can see the color differences...so far only giant smiley faces (this batter was all the same consistency) but there are still many to go, will keep cutting. So I guess using a darker batter for the big part of the cake may not be a good idea. Or it could have just been my dark batter of thinner consistency. Will have to keep experimenting. I'm guessing that perhaps the bigger part needs to be the lighter batter, no matter what batter is used.
Hi Melissa I have just joined your site to get this video as my sister LOVES leopard print so I want to try and make one for her birthday. It's so clever how you do it. Now I have discovered a whole heap of videos and cakes I wants to try :) I just wanted to ask a few questions. Firstly what is the box mix that is mentioned in the batter recepie? Secondly is there another cake mixture recepie I could use other than the white almond sour cake mix that would be thick enough to get the same results? x
Hi Ann, I am not sure where you are located but I do know that boxed cake mixes such as Pillsbury and Duncan Hines are not available to everyone. You can still make a leopard print on the inside of your cake using a from scratch recipe. I have used both the 1234 Cake and Favorite White Cake from our recipe section and both worked just fine. The difference was that with both of these recipes I did not have enough batter for 3 cake layers.....my cake was only two layers tall, but that was fine. Also, in Melissa's video, each of her cake layers had 2 layers of spots. When using my scratch recipes I had only enough batter for 1 layer of spots.....still looks like leopard spots just not as many of them. You would need to double the scratch recipes that I mentioned to get a 3 layer cake with each layers having 2 layers of spots and of course, there would be left over batter. As long as your cake batter is not runny you won't have a problem with your leopard spots sinking or becoming muddled. Hope this is clear. Just look at the picture of Melissa leopard cake and visualize it as a two layer cake with only one layer of spots on each cake layer. Let me know if you have other questions.
WOW, Melissa!!! This is absolutely gorgeous!